While composing in a notation program like Finale or Sibelius is a quick way to get your music in front of players, there are a number of scenarios when it is necessary to use Virtual Drumline within a sequencer such as Logic, Cubase, or Digital Performer. Some of these situations might include:
- Writing for a show that involves electronics and samples
- Creating multiple mixes so players can practice their parts
- Tweaking the playback of music written in Finale or Sibelius
- Scoring to picture
The release of Logic Pro X brought a number of new features including track stacks and patches. Both of these features can help save loads of time and keep your creative flow uninterrupted. Let’s dive in!
PATCHES
Patches are presets for your software instrument tracks. A patch stores everything within the track including the AU instrument and its settings, effects, routing, and any aux tracks connected to the instrument track via sends.
To save a patch, all you have to do is:
- Open the library by typing the ‘Y‘ key
- Select the track you want to save
- Click the Save button at the bottom right of the library
- Specify where you want the patch to be saved

Patches make recalling instruments really fast. To recall a patch:
- Create a new software instrument
- Open the library by typing the ‘Y‘ key
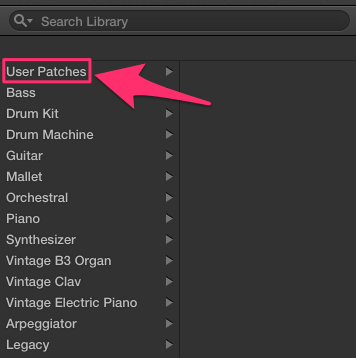
- Click the ‘User Patches’ folder (you can also use the search bar)
- Select the patch you want to use

That’s it! The instrument is loaded and ready to go.
GET YOUR VDL PATCHES FOR LOGIC PRO X
As a free bonus, we’ve created Logic Pro X patches for every instrument in VDL 2.5.5! You can download them at the links below.
TRACK STACKS
Track stacks allow you to control multiple tracks simultaneously. You can view, hide, solo, mute, and add effects to all tracks in the stack at once.
To create a track stack:
- Select the tracks you want included
- Go to ‘Tracks’ > ‘Create Track Stack…’
From here, you will be presented with the option to choose either a ‘Folder Stack’ or a ‘Summing Stack’. You can read more about these by clicking the ‘Details’ dropdown arrow. For now, we want a summing stack. Your selected tracks will now be enclosed by a track titled “Sum 1”. You can rename this to whatever you like. From here, any actions applied to this track will affect all of the tracks within it.
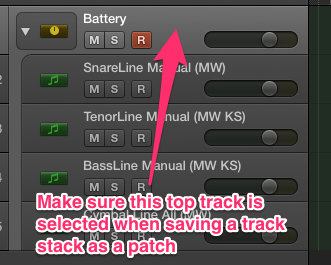
One of the best parts of track stacks is that you can save them as patches! For example, you could create a stack with snares, tenors, basses, and cymbals. Select the ‘Sum 1’ track and follow the process outlined above for saving patches. When you recall the patch, Logic will load a full battery with each instrument on its own track automatically!

GO WITH THE FLOW
By taking a little time to create patches and track stacks pertinent to your workflow, you can greatly increase the speed and ease at which instruments are loaded into your session. When inspiration strikes, you can instantly have the correct instrument(s) ready to go. This added flexibility will keep you less distracted by nerdy computer stuff and more focused on your music. Happy writing!
A QUICK NOTE FOR THE DAW HEADS
For more experienced users, taking full advantage of track stacks and patches also requires a slightly new approach to setting up your session. For a long time, it was more CPU efficient to run multi-timbral instances of Kontakt (i.e. up to 16 instruments loaded per instance). Logic, however, processes each track on a single core. As a result, the multi-timbral approach is actually less efficient, since Logic is unable to disperse the load as evenly. It is more efficient to load one instrument per Kontakt instance, where Logic can then decide how each track is to be processed among the cores. With today’s computers, the added CPU footprint of the extra instances is not even close to what it once was. You can read more about this here.
This article was first published in Fall 2014, and was written by Tapspace production assistant, John Weisiger.


